Requesting a feature change
I send John so many emails every day with ideas for improvements that he decided to really make the feature request useful. We are encouraging project administrators to try it out too.

Tips for getting the most out of WikiMapping.
I send John so many emails every day with ideas for improvements that he decided to really make the feature request useful. We are encouraging project administrators to try it out too.


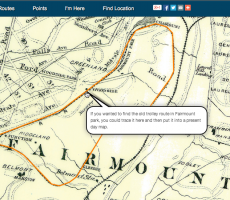
I’m going to describe how I imported an 1899 map into WikiMapping. Why do this? It’s searchable. I can trace it and bring the data into my own maps. I can highlight information to share with others. And, I just love old transit maps.
The project I’m referring to is here.
Mike Szilagyi had given me a scan of some Philadelphia trolley maps, and I don’t know if I ever put them on PhillyMap.com. Since I came across them, I thought I might put a hundred and fifteen year-old map on WikiMapping.
In QGIS, there is a georeferencing plug-in. I followed the steps in the Kindle book, Learning QGIS 2.0, which is pretty basic but still useful. I don’t think one needs much guidance. You have to load an open street map or other base as a reference. The general concept is to open an unprojected tif, click a point on the tif, and then click a point on a corresponding reference base map in Web Mercator.
There were a couple of good tips for saving the document. I used the following.
From here, you can create map tiles using a plugin called QTiles. If you are going to host your files on your own server, then you can use a larger zoom level. The file size limit on WikiMapping is 100 MB. For this map, I could get to a zoom of 15. A zoom of 18 was nearly a gigabyte in size.
Saving all of the levels took about 15 minutes on my Macbook Air. Speaking of which, my old laptop is powerful enough so that I can work on a 350 MB map, about 80MB of which is raster and MAPublisher data.
To sum up… I feel confident that I can get any map that I need to into WikiMapping. And by placing a destination point, I can get directions to that point and see my current location on the old map. It’s a fun way to explore history.

Create a survey using the Survey menu item and then join it to a point, route, or introduction. You can join the same survey to multiple point or line categories.
Use a survey in the introduction to ask general questions of contributors to your project after the welcome message. Then use other surveys to gather specific information about a point or a line (route).
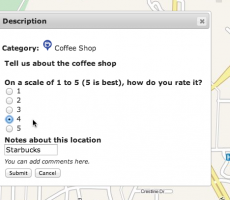
WikiMapping handles surveys differently than comments and photos. A contributor to your map can change a comment, but the survey can’t be edited once submitted. Here is what a line category looks like with a comment. The contributor can enter text into the text field and then press submit.
A survey has several input options, such as pull-down menus, text fields, radio buttons, check boxes, and instructions. In the image below, Descriptions are not part of the survey. Descriptions are part of the category and change the icon when submitted. Surveys and Descriptions can be combined.
Surveys are designed in Survey (in the dark blue menu).
This brings you to a listing of surveys. To create a new survey, select New Survey. After that, select Design.
Select a question type in the tool bar (below). Then edit each question and drag them to set the order. If you want a title at the top, use the Label.
Surveys are not editable once you add data. This preserves the integrity of the survey. If you need to edit the survey, a checkbox on the main survey page will override the locked survey design.

In Edit Project, First Login Survey – Select a survey.
As a result, a survey will follow the registration dialog box. It would look something like this:
Select a category, and then select edit.
Survey – Select the survey from the pull-down menu. You have to create the survey first.
Option: Create Survey Only – If this is unchecked, then any contributor can fill out a survey for that point. If checked, then only the person placing the point can fill out the survey. Others can still add comments. When Create Survey Only is checked, this is how other contributors will see a completed survey. There is a box containing the questions and original answers.
If Create Survey Only is left unchecked, this is what other contributors will see:
Once someone has filled in a survey, they will see the original comment box.
You can approach surveys a couple different ways. A project administrator can let people add their own points and routes and attach surveys. This is helpful when you want to get peoples suggested locations or routes. A project administrator can also make the category Admin Only. Visitors to the project will see the data and be able to comment on it via the survey. They won’t be able to add or modify data that they are commenting on.
Surveys help you get discrete answers that can be more easily tabulated than the open ended comment.